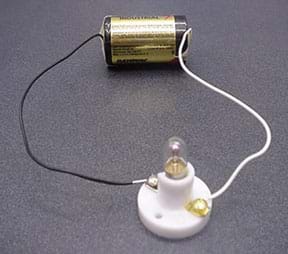
1) Make a simple circuit consisting of a battery and a torch bulb (in a holder).
3) Mount the two ends of the wire (the switch) on a small wooden block using blu-tack.
4) Position a fan in front of the block and switch the fan on.
5) Set the fan to oscillate. You want to position the ends of the wires on the wooden block so that when the fan is facing directly forward (during oscillation) towards the wires, the wires are blown together and complete the circuit, making the light come on. Ensure that, when the fan is facing away from the block (during its oscillation cycle) the wires come apart and the light switches off. (Naturally, the wires should also be apart before the fan is switched on.)
6) Buy an electric timer and set it to come on when you are likely to be in rem/dream sleep (this one is from Wickes).

7) Plug the fan into the timer and remember to set the fan on oscillate.
Night use
At the set time, the timer switches on the fan and the light flickers while the fan goes through its oscillation cycle.This flickering should be incorporated into a dream to help you realise you are dreaming.
Further points
You can use an LED instead of a torch bulb.
You can either position the bulb next to your bed, or find a way to mount it on a sleep mask (in which case, it would be safer to use a LED rather than a breakable bulb).
When you position the wires on the wooden block, it's fairly easy to find a position that makes the wires vibrate against each other and thus increase the flickering of the light.
When you find the best position for the wires on the block using blu-tack, you can make the positioning permanent by using tape or glue.
Nice blog and topic as well.
ReplyDeletediy conservatory